
Select a Chapter
-
1
Visa Guide Introduction and Where to apply for my J-1 visa?
Welcome To Your Visa Guide!Where do I apply for my visa?Applying for J-2 dependents
-
2
Visa Process Steps
Visa Process Steps
-
3
Know Your Visa Type
Know Your Visa Type
-
4
Complete Your Application
Complete Your Application
-
5
DS-160 FAQs
DS-160 Frequently asked questions
-
6
Pay Your Visa Fee and Schedule Your Appointment
Pay Your Visa Fee and Schedule Your Appointment
-
7
Pay Your SEVIS Fee
SEVIS fee frequently asked questions
-
8
Attend Your Interview
The interviewU.S. Embassy visa interview tips
-
9
Track Your Passport
Receive your passport with visa and travel
-
10
Enter the U.S. in J status
Remember to enter the U.S. in J status
-
11
Customs and your I-94 arrival record
Customs, immigration and your I-94 arrival record
-
12
Bringing Your Family to the U.S.
Bringing Your Family to the U.S.Financial ResponsibilitiesJ-2 Visas for dependent children aged 17-21Optional family expensesOptions for family members' U.S. arrival
-
13
Employment in the U.S.
Employment in the U.S.
-
14
Travel with My J Visa
How do I travel with my J visa?
-
15
Maintaining J status
Maintaining visa status
-
16
Helpful Websites
Helpful websites
Visa Guide
Visa Guide Introduction and Where to apply for my J-1 visa?
Welcome To Your Visa Guide!
All rights reserved. No part of these materials may be reproduced in any form without written permission of the copyright owners.
After receiving your visa packet with your Form DS-2019 (Certificate of Eligibility), you should familiarize yourself with the content of this visa guide. Then enter the website of your home country U.S. Embassy or Consulate and start the process of applying for your J Exchange Visitor Visa in the Teacher category.
This Visa Guide is intended for new Ambassador Teachers, who are applying for their initial J-1 visa(s).
Where do I apply for my visa?
You must apply for your J-1 visa at the U.S. Embassy or Consulate in your country of citizenship or legal permanent residence.
Participate Learning does not recommend third-country visa processing (applying outside your home country). It is more difficult to qualify and carries a higher risk of denial.
Important: If you are subject to the two-year home residency requirement, the country where you apply for your J-1 visa may determine where that requirement must be fulfilled. J-1 exchange visitors must generally spend two years outside the U.S. after completing the program before applying for certain future visas.
Visa interview and screening
-
A personal interview is usually required.
-
Social media screening is mandatory for all J visa applicants. You will be asked to list your social media handles.
-
Some applicants may qualify for an interview waiver and submit documents by mail or drop box from their home country only.
-
Participate Learning does not recommend this option, as it may significantly delay the return of your passport.
-
Scheduling your appointment
Interview wait times vary by country. You should schedule your interview as soon as you receive your DS-2019, complete the DS-160, and pay the required fees. Don’t forget the SEVIS fee!
-
Some embassies will not schedule interviews more than 120 days before your program start date.
-
Application procedures vary by embassy and change frequently. Always check your local embassy’s website for the most current instructions.
-
The embassy link is included in your welcome email and this brochure.
-
During the interview (or a separate appointment), you will provide:
-
10 ink-free fingerprints
-
A digital photo
Some applicants may be selected for additional screening, which can delay visa processing.
Applying for J-2 dependents
Eligible dependents may apply for J-2 visas at the same time as the J-1 applicant.
Who is eligible:
-
Legal spouses
-
Unmarried children under age 21
-
Dependents must intend to live with the J-1 in the U.S. for the duration of the program
-
Dependents should join the J-1 within 30 days, or may apply during designated application periods (see “Bringing your family to the U.S.”)
Requirements:
-
Proof of relationship (marriage certificate or birth/adoption documents)
-
Proof of sufficient financial resources to support dependents
-
Each dependent must complete their own DS-160
-
J-2 dependents cannot enter the U.S. before the J-1
When completing your DS-160 embassy application, you will have an option to create dependent applications using pre-populated information, which is the easiest option. Once you receive your own DS-160 confirmation, you will see an option to complete another application for your first family member (J-2).
Dependents who plan only short visits (not residing in the U.S.) may instead apply for a B-2 visitor visa or travel under the Visa Waiver Program, if eligible.
Important reminders
-
Do not use outside companies to complete your visa application.
-
You must complete the application yourself, using a computer.
-
The application is lengthy, so plan enough time to complete it carefully.
Now let’s start the process!
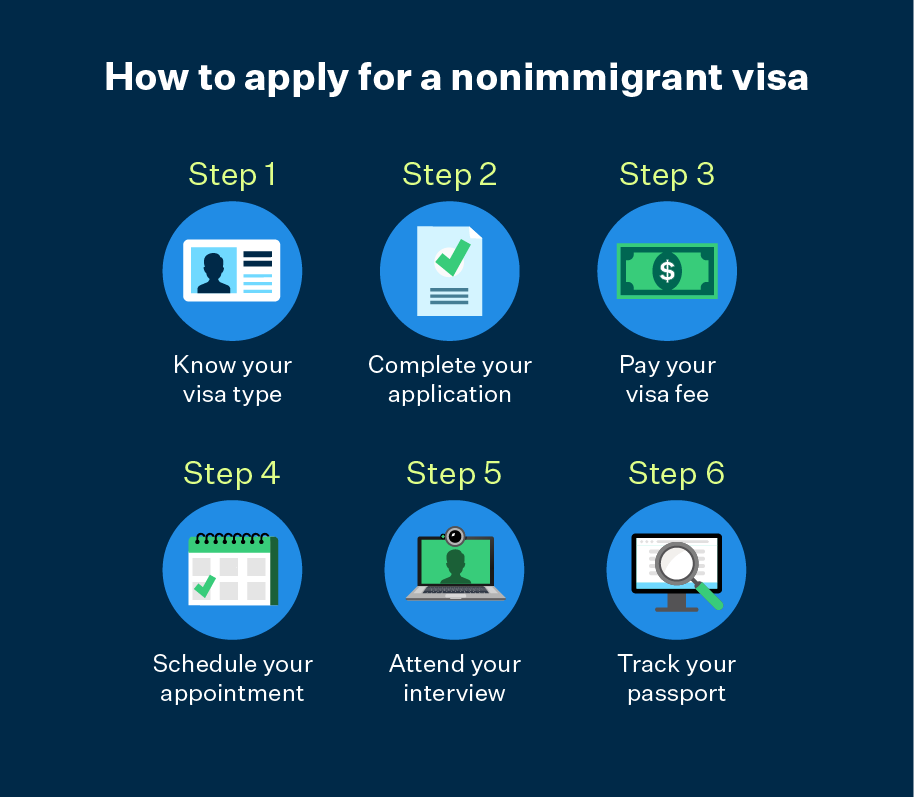
Visa Process Steps
Know Your Visa Type
You are applying for a J-1 visa in the Teacher Category. This is a Nonimmigrant Visa. Your dependents are applying for a J-2 visa, as either spouse or child of a J-1. Please note that when you complete your application with the Embassy, you will see other J visa categories, such as Student Work Travel (SWT) or intern, to name a few. Please ensure to carefully read all information, and apply for the correct category – J-1 Teacher.
The J-1 Exchange Visitor Visa in the Teacher category is intended for educational and cultural enrichment: Exchange teachers sharpen their professional skills and participate in cross-cultural activities in schools and communities, and they return to their home school after the exchange to share their experiences and increased knowledge of the United States and the U.S. educational system.
Complete Your Application
-
You will need to complete an online DS-160 visa application form with the embassy for yourself (for a J-1 visa) and a separate DS-160 application for any family members who will travel with you (for a J-2 visa). Start with your own application.
-
Go to the USTravelDocs website and select your country.
-
Each country will display slightly different instructions, but ensure to note any alerts specific to your home country.
-
Always select the information for “Nonimmigrant visas”.
-
Review all the steps to complete your visa application.
-
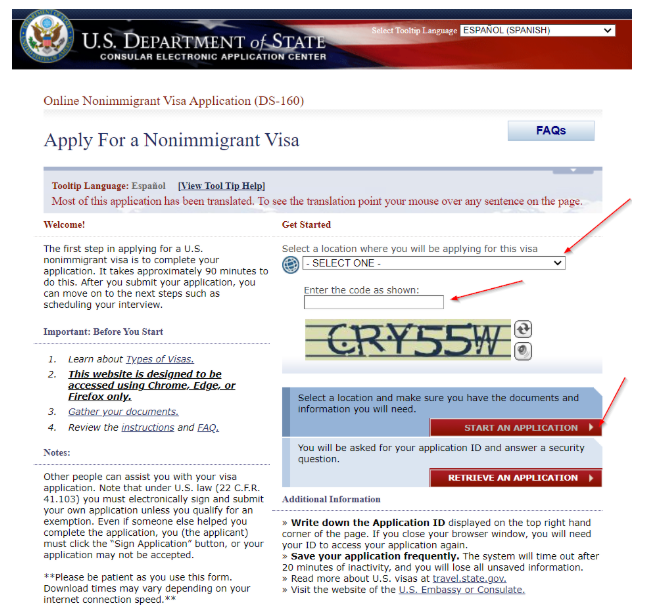
Start by completing your DS-160, Online Nonimmigrant visa application form, also linked from your home country visa application page.
-
You may want to review the “DS-160 Frequently Asked Questions” chapter prior to starting the application.
-
Select your country of residence, enter the “captcha code” and click on START AN APPLICATION.
-
Read about the Computer Fraud and Abuse Act Notices, and click on I AGREE.
-
You will be given an application ID and asked to answer a security question. Write this information down so you don’t forget it. You may need it in the future to access your application. The system may also time out, and you will need to log back in with your application number.
-
Read each question carefully and answer truthfully.
-
Take your time. If you are not sure how to answer a question, refer to our DS-160 Frequently Asked Questions or note the “Help segment” next to each field. Select “Does not apply” only if something does not apply.
-
When you finish the application, write down your DS-160 confirmation number and print the confirmation page.
-
IF YOU HAVE FAMILY THAT WILL TRAVEL WITH YOU: At the end of your application, there is an option to start an application for a family member with pre-populated information from your own application. When you select “Email Confirmation” on your Confirmation Page, you will be directed to a “Thank You” page. On the “Thank You” page you will see an option to create a family or group application. When you select this option, certain information from your application, such as destination, will automatically be imported to and displayed on a new application. Please note that if you use this option you must still create an individual application for each family member or for each individual.
After you have completed the DS-160, return to your home country Embassy website to complete the next steps: paying your visa fee and scheduling your appointment.
DS-160 Frequently asked questions
Please refer to this list of frequently asked questions when you are completing the visa application.
⚠️ Important: A separate DS-160 application must be completed for each J-2 dependent.
Please also refer to the “help segments” next to each question in the DS-160 application.
Surname / Family Name
-
Enter your last name exactly as it appears in your passport.
-
Maiden names are not required.
-
If unsure, refer to the machine-readable barcode at the bottom of your passport biographic page.
National Identification Number
-
If your country issues a national ID card, enter the number exactly as it appears on the card.
-
If your country does not issue one, enter: “Does not apply.”
-
You must always enter your passport number.
Home Address
-
You must list a foreign residence address.
-
Do not list a U.S. address unless it is specifically asking for where you intend to stay in the U.S.
-
The address must be your residence — not “in care of” an employer.
Telephone Numbers
-
You must provide any that are relevant to you:
-
Home telephone number (associated with your home address)
-
Cell phone number
-
Business telephone number
-
Business fax number (if applicable)
-
Social Media Information
-
You are required to list:
-
All social media platforms used in the past five years
-
All usernames or handles used on each platform
-
-
If you have:
-
Multiple platforms, or
-
Multiple usernames on one platform
-
Click “Add Another” to list each separately.
-
This requirement has been in place since 2019, and the information may be reviewed as part of your visa application.
-
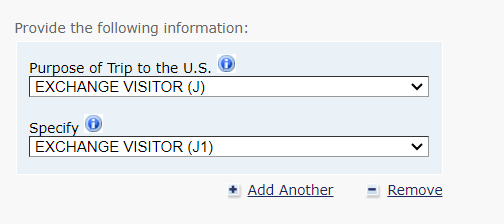
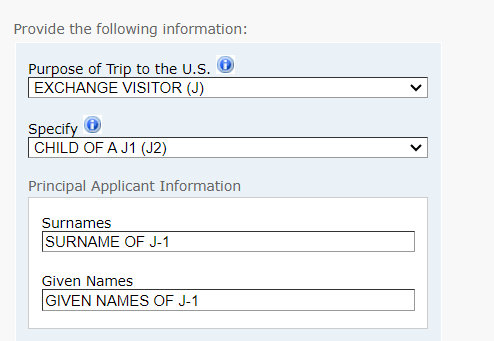
Purpose of Trip
-
For J-1 teachers: Select “Exchange Visitor (J)”.
-
For J-2 dependents: Select spouse or child, as applicable.
⚠️ Do NOT select “Add Another.”
Each dependent must complete a separate DS-160 application.
When do you intend to arrive in the United States?
-
This is your estimated date of arrival, listed on your DS-2019 and educator agreement.
How long do you intend to stay in the United States?
-
Your stay is temporary, not to exceed the program end date as listed on your DS-2019 form.
At what address will you stay in the United States?
-
You may enter the address for the Center for Intl. Education, Inc. dba Participate Learning.
-
201 Sage Rd. Suite 200 Chapel Hill, NC 27514
-
-
If you already have secured housing in the U.S., you will still enter the Participate Learning address. You can update it after you have finished orientation.
Name and telephone numbers of person in United States with whom you will be staying or visiting for tourism or business?
-
You are not a tourist, nor are you coming to the United States for business purposes. You are coming to the United States with a J-1 visa as a cultural exchange visitor. To answer this question, please write as much as fits in the field of your sponsoring organization:
-
Center for International Education, Inc.,
-
To fill the space for each of the telephone numbers requested, enter the company telephone number:
-
919-967-5144.
Who will pay for your trip?
-
Your visa sponsor, The Center for Intl. Education, Inc. will pay for your airline ticket to the U.S.
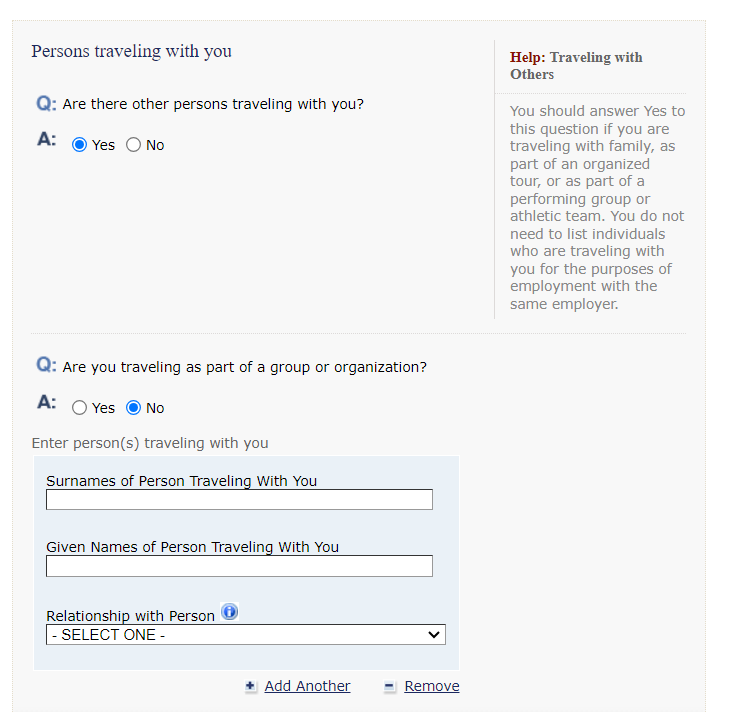
Are you traveling as part of a group or organization?
-
No, you are not. However, you must add all family members traveling with you in this section. See example below, IF you are traveling with a family member. In this section you may “add another” for additional family members that will be traveling with you.
Have you ever been in the United States?
-
Indicate whether you have ever been in the United States, including the dates and duration of any previous visits (with or without a visa).
Have you ever been issued a U.S. visa?
-
You must enter yes if you have ever been issued any type of visa to enter the United States, even if you never used that visa to travel. If a U.S. visa was issued to you at any time in the past, check yes and include information on the location of the embassy that issued you the visa, the date the visa was issued and the type of visa issued. (For example, visitor visas are B visas.)
Have you ever been refused a U.S. visa?
-
You must answer “Yes” if you have ever been refused or denied any type of U.S. visa at any time in the past.
-
If No, select “No” and leave the remaining fields blank.
-
If Yes, provide:
-
The embassy or consulate location
-
The date of refusal
-
The type of visa refused
-
-
If you were previously denied, you must explain the circumstances when applying for a new visa. Prepare a letter to attach to your application describing the facts of the denial.
-
In most cases, your passport will contain a stamp showing the date the visa application was received, which serves as a record of the refusal.
❗Answer this question honestly and accurately. U.S. embassies and consulates maintain electronic records of all prior visa applications.
Has your U.S. visa ever been cancelled or revoked?
-
If a consular officer has ever written “REVOKED” or “CANCELLED” across the face of any type of visa for which you were issued, you must check yes. You should write a letter to the consular officer and attach it to your visa application, explaining the circumstances regarding the visa cancellation or revocation.
Full name and address of contact person or organization in the United States?
-
In this item, enter your J-1 sponsor, the Center for Intl Education, Inc., 201 Sage Road, Suite 200, Chapel Hill, North Carolina, 27514. Telephone: 919-967-5144. You may list as “Other”.
Family information: relatives?
-
If you have a relative living in the United States, then you must indicate his or her full name, date of birth and status.
Family information: children?
-
You may list all unmarried children under the age of 21 who are not living in the United States. If your children are not accompanying you to the United States for your initial program start, but may join later, it is appropriate that you indicate at this time that they may join you later in the United States.
Work experience – present /previous?
-
You are required to provide employment information for the past five years. Enter your present place of work. If you have worked there for five years or longer, this is sufficient. If not, complete previous work, as long as you provide information for at least five years back. For each position, enter the job title, dates of employment, employer’s name/address/telephone number and description of your job duties. If you changed positions with the same employer several times, each job should be a separate entry.
Do you intend to study in the United States?
-
Select No.
-
You are coming to the U.S. as a teacher, not a student. It is fine if you are currently studying, however, this is not the purpose of your J-1 visa.
-
-
If you see a message like “you have indicated that you intend to study in the U.S.”
-
Don’t worry — this is normal as the application is the same for all J visa categories, Continue the application.
-
Add Two Contacts in Your Home Country (Required)
-
You must list at least two contacts in your home country who can verify information about you.
-
For each contact, enter:
-
Full name
-
Street address (no P.O. boxes)
-
Telephone number
-
Important:
-
Do not list relatives. Use close friends or business associates when possible.
-
Complete Every Question
-
Answer every question in the DS-160.
-
If a question does not apply to you, type: Not Applicable.
Review and Submit Carefully
-
Double-check all information before submitting.
-
Submit the DS-160.
-
Print the DS-160 confirmation page after submission and keep it for your visa appointment.
What to do if you make a mistake:
-
If possible, correct the information in the form before submission.
-
If you cannot correct it, inform your International Admissions Specialist and ask for advice.
❗ Major Errors (A new DS-160 is required)
What to do:
-
Complete a new DS-160 form.
-
Print the new confirmation page.
-
Update your profile
-
Bring the new confirmation page to your appointment.
⚠️ Do Not Miss Your Appointment
-
Do not skip your visa appointment because you found an error.
-
Bring your confirmation page and follow the steps above.
Pay Your Visa Fee and Schedule Your Appointment
Note: In addition to the visa fee paid to the Embassy, as of October 1, 2025 you may also be required to pay a “visa integrity fee” of $250. There is NO SEVIS fee required for a renewal visa.
-
After printing your DS-160 confirmation with barcode, you need to create your account profile, unless you already have one.
-
Enter the DS-160 confirmation number for each applicant applying for a visa.
-
Provide an address or select a location where you want to receive your documents from the Consular Section.
-
Pay the nonimmigrant visa application fee(s) using one of the payment methods available in the country where you reside. You must pay the visa fee for EACH J-2 APPLICANT and any Reciprocity Fee, should your country require it.
-
Schedule a Consular Section appointment (A separate appointment is sometimes needed for fingerprinting.)
-
What happens if there are no visa appointments? Email your International Admissions Specialist and let them know. You can also keep checking the calendar every day to see if new slots open up. Many embassies release appointment dates a few times per week, so it is important to check back frequently.
-
What happens if the only appointment I could find is a date far in the future? Schedule it and inform your International Admissions Specialist. You should also keep checking the calendar every day to see if new slots open up so you can reschedule for an earlier date.
In preparation for the visa appointment, please review the following:
What Documents are Required for your visa interview? Please also check your home country embassy website for country specific requirements.
► Signed, original DS-2019 form
► Fully completed electronic Nonimmigrant Visa Application Form DS-160 barcode confirmation page
► Payment of visa application fee for each visa applicant (This fee is nonrefundable. Check instructions for the method of payment required for your country.)
► Receipt for payment of SEVIS fee (J-1 only)
► Payment of visa issuance fee or reciprocity fee, if applicable (To determine if your country of citizenship requires a reciprocity fee, see link at the end of this document.)
► Photograph(s) (For required photo format, please check your embassy website. You will have an opportunity to upload a digital photograph as part of completing Form DS-160.)
► Passport valid for travel to the United States with a validity date covering the full program with Participate Learning, up to 5 years, if possible, with a minimum of 3 years stay in the United States (The name on your DS-2019 form must match the name on your passport. Do NOT change your passport after you have been approved for your visa. If you need to renew your passport, it must be done prior to completing the visa process)
Note: It is important that you review the website of the U.S. Embassy or Consulate for your country for the most current information as the specific process varies for each embassy and changes from time to time. Fees are subject to change.
Important Reminder
You must prove to the consular officer that you have binding ties to a residence in your home country that you do not intend to abandon. You can prove this by providing evidence of strong and binding social, family and economic ties to your home country. Under U.S. immigration law, all nonimmigrant visa applicants are viewed as intending to immigrate to the United States unless the applicant can convince a consular officer to the contrary. “Ties” to your home country are the things that bind you to your homeland: job, family, financial prospects, property, etc. Examples of evidence that may be used include bank statements for three to six months; statements from retirement/pension/investment accounts; deed/title to property, land or house; title to personal vehicle; lease documentation; tax documentation showing payment in home country for three years; inheritance documentation; licenses from family owned businesses; birth certificates or resident permits of immediate family members remaining in home country; letter from previous employer indicating intent to rehire upon return to the home country; paystub from previous or current employer; etc. This list is not exhaustive and will vary depending on your individual circumstances.
SEVIS fee frequently asked questions
SEVIS FEE INSTRUCTIONS:
Ready to pay your SEVIS fee? Let’s get started! Please review the following instructions carefully.
You should pay the U.S. SEVIS fee online with a credit card. In this section, we will provide detailed instructions. (If you are not able to pay by credit card online, please notify your International Admissions Specialist immediately.)
Remember, you must pay the SEVIS fee at least three business days before your visa interview, or, for Canadian citizens, three business days before you arrive at a U.S. port of entry. In addition to the visa fee paid to the Embassy, as of October 1, 2025 you are also required to pay a “visa integrity fee” of $250.
► Go to the SEVIS I-901 fee website
► Click on the link, “Pay I-901 Fee.”
► Enter your SEVIS number from the top right corner of your DS-2019 form. The SEVIS identification number starts with “N” followed by the numbers.
► Enter your name and date of birth as it appears on your DS-2019 form. If the information on your DS-2019 form is NOT correct, do not pay the fee. Contact your International Admissions Specialist immediately.
► You will be asked to select DS-2019 form for J-1 exchange visitor.
► Enter your email address, country of citizenship, country of birth and your home address information.
► Exchange Visitor Program Information
► Locate the Program Number from Section 2 of your DS-2019 form.
► Select category “Teacher” from the dropdown menu.
► Click “AGREE” and continue.
► Verify carefully that all information is accurate on the Form I-901 review page.
► Make the payment and provide all required credit card information. Verify the information and then submit for processing. The system will process your information and will approve your credit card payment. Your card will be charged for the SEVIS fee, and you will receive a confirmation.
► Print out your Confirmation Sheet with the Student and Exchange Visitor Program: SEVIS I-901 Fee. This is your receipt, which you will take with you to your visa interview and when applying for admission at a U.S. port of entry. We recommend printing out several copies of this receipt and writing down the reference number that will appear on your screen after your payment has been processed. You may need this for future visa renewal applications.
This fee is nonrefundable, not reimbursable and nontransferable. Verify all information carefully before you submit your payment. The information in your passport and DS-2019 form must match the information submitted on the online I-901 form. If you complete this form incorrectly, you must submit another application and pay the SEVIS fee again.
The interview
You have done everything else and now you just have your visa interview remaining. Please be aware that some embassies may not schedule your interview more than 120 days before your U.S. arrival date. Note that you must sometimes also wait 48 hours after submitting your DS-160 before you may schedule your visa interview
Following is a list of suggestions and reminders as you prepare for your visa interview. Please read them carefully.
► Truthfulness. You should answer all questions on your visa applications and any question that the consular officer asks you completely and truthfully. Misrepresentations or falsification of information can lead to a permanent ban from entering the United States.
► Be brief and to the point. Because of the high number of applications received, consular officers are under considerable pressure to conduct a quick and efficient interview. They must make a decision, for the most part, on the impressions they form during the first minute of the interview. The initial impression you create is critical to your success. Keep your answers short and to the point.
► Maintain a positive attitude. Do not argue with the consular officer. You should be polite, but assertive, at all times. If you are denied a J-1 visa, ask the officer for a list of documents he/she would suggest you bring to overcome the refusal. Also try to get the reason(s) you were denied a visa in writing.
► Know Participate Learning and how it fits into your career plans. If you can articulate the reasons that you want to take part in the program and how your participation in this program will benefit you professionally upon your return to your home country, you will most likely be able to convince the consular officer of your nonimmigrant intent. You must be able to explain Participate Learning, the processes you undertook to become part of Participate Learning and a brief description of Participate Learning as an exchange visitor program.
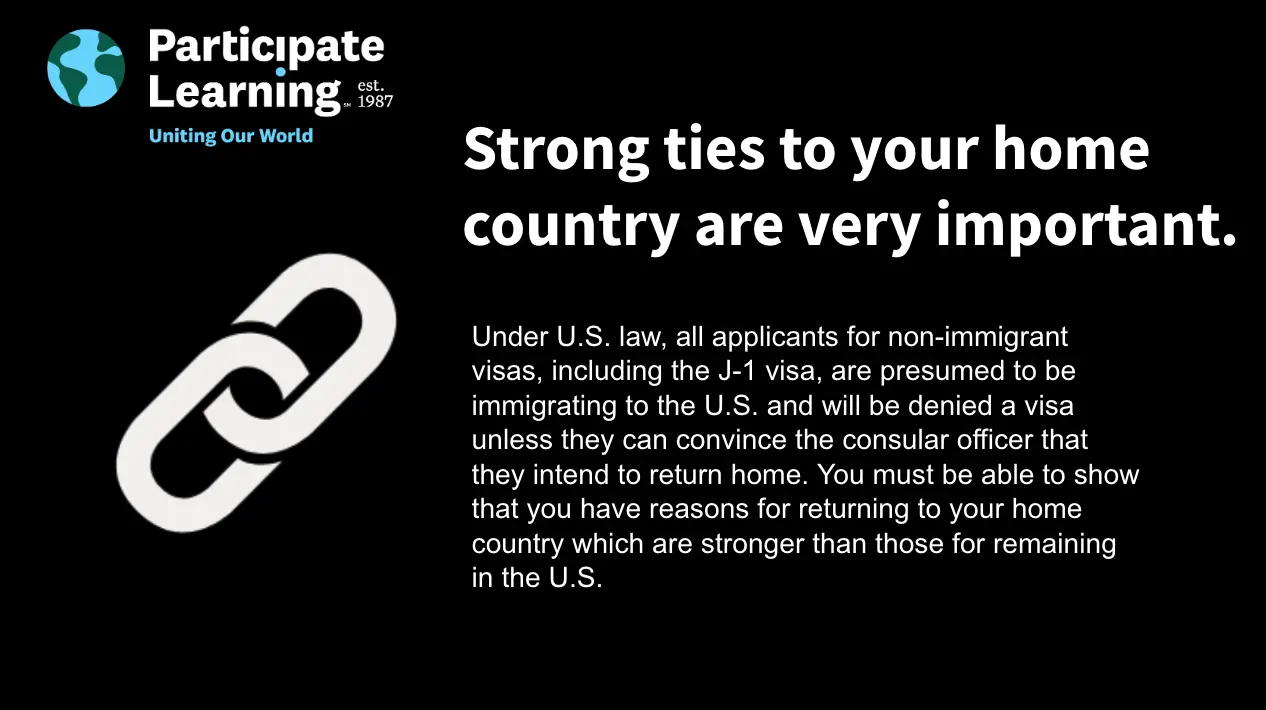
► Prove ties to your home country. Under U.S. law, all applicants for nonimmigrant visas, such as the J-1 visa, are viewed as intending immigrants until they can convince or persuade the consular officer that they are not. You must show that your reasons for returning to your home country are stronger than those for remaining in the United States. “Ties” to your home country are the things that bind you to your hometown, homeland, job, family, financial prospects that you own or will inherit, or investments. A letter from your previous employer indicating their intent to rehire you upon your return to your home country is an example of good evidence.
► Financial resources. If you intend to bring your family with you to the United States, be prepared to have evidence to show financial resources available for your family members’ support in the United States. This can include bank statements, investments or title to property. Note that you are financially responsible for your dependents.
► Additional documentation. It should be immediately clear to the consular officer what written documents you are presenting and what they signify. Lengthy written explanations cannot be quickly read or evaluated. You will have two to three minutes of interview time, and you must have your evidence organized and clearly labeled.
VISA APPOINTMENT TIPS AND REMINDERS
-
Before you go to your visa appointment, read the instructions carefully on the Participate Learning Visa Guide.
-
If you are applying with family members, you should attend the appointment together. Many U.S. embassies and consulates now require children under 14 years old to attend the visa appointment. Even if a child is not required to attend, you should bring all documentation for them to the appointment.
-
If traveling with family members, you will need to show proof of your relationship to your spouse and/or child presenting marriage and/or birth certificates. If traveling with children, both parents need to be present at the visa interview or bring a full custody or guardianship agreement.
-
Arrive at least 15 minutes before your scheduled appointment time. You may not enter the Embassy with any weapons (including guns or knives), cellular telephones, photographic or video cameras, electronics such as radios, or other equipment, including computers.
-
Once you complete your visa interview, the consular officer will tell you if your visa is approved, and they will give you a document stating the outcome.
-
The consul will keep your passport and send it back to you once the visa has been issued.
-
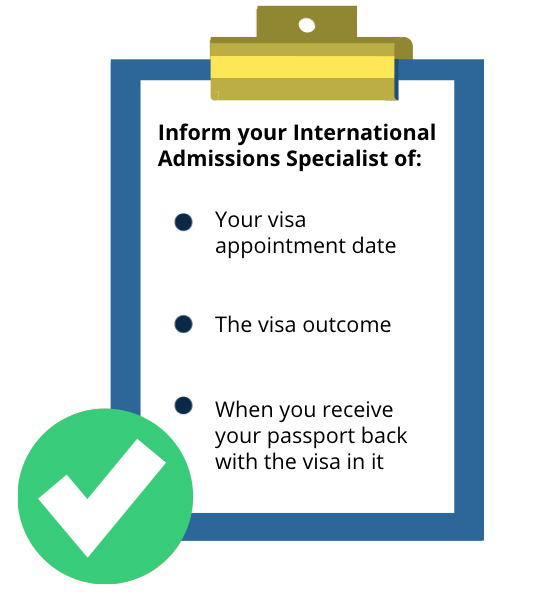
Notify your International Admissions Specialist as soon as possible about the outcome of your visa interview.
-
Notify your International Admissions Specialist as soon as you get your passport back with the visa in it. This is how we know you are ready to travel, so we cannot purchase your plane ticket until you tell us.
 Download our visa interview preparation checklist
U.S. Embassy visa interview tips
Receive your passport with visa and travel
The method of returning your passport and visa varies from country to country. Most embassies will mail you the visa by special courier three to seven days after approval. Please request the fastest method of delivery. Make sure that the embassy returns your passport, your J-1 visa (which says J-1 and is affixed in your passport) and your original DS-2019 form. Some embassies will put the DS-2019 form in a sealed envelope (which should not be opened) or staple the original form in the passport. Ensure to ask when to expect your passport return with your visa. Check your visa for accuracy, and notify the embassy immediately if you notice any errors.
Most likely you will receive a visa that is valid for international travel for the length of your participation. If your visa has a limited number of entries or an expiration date that is earlier than the program end date on your DS-2019, you can still come to the United States to begin your program but may need to renew your visa in your home country for further international travel. If this happens to you, please notify your International Admissions Specialist.
Don’t forget to upload a copy of your passport, visa, and DS-2019 into the document portal.
Notify your International Admissions Specialist at three important stages of the visa process
Remember to enter the U.S. in J status
Soon you will be on your way to your new school in the United States. When you begin your journey, please remember the following:
Entering the United States: Upon arrival, you must present to the customs and border protection officer (CBP officer) three key documents: your DS-2019 form, valid passport and valid J-1 visa affixed to passport. (Note: Canadian citizens are not required to obtain a visa for travel to the border. See section below for additional information.)
Note that cell phones may be inspected upon arrival in the U.S. Travelers may wish to delete or disable any apps with personal or demographic information (social media, email, photo albums, health tracking, etc.) they do not wish to be subject to review.
Inform the CBP officer that you are a newly arriving exchange visitor and answer all of his or her questions clearly and accurately. You will be asked to provide two electronic fingerprints and a photograph as part of the US-VISIT program. If you enter via air or seaports, you will no longer be given an I-94 card that you may have received in the past. Your I-94 record now appears electronically and Participate Learning will assist you in printing your record at orientation. Do not leave the port of entry without the original DS-2019 form.
Remember to keep the following additional documents in your carry-on luggage or other accessible location in case the CBP officer requests additional information:
► Contact information for Participate Learning
► The paper receipt for your SEVIS fee
► A copy of your educator agreement and banking statements or other evidence of financial resources in addition to the teaching salary indicated on your DS-2019 (particularly if you are traveling with dependents and were required to present financial evidence at your visa interview)
Customs, immigration and your I-94 arrival record

IMPORTANT:
Your I-94, DS-2019 form and valid passport with J-1 visa are the key documents that document your lawful status in the United States. You should keep the documents in a secure and accessible location during your stay, and we recommend that you at the very least keep copies with you at all times. Your accompanying family members should do the same.
Additional inspection procedures:
-
Even though a J-1 visa authorizes you to travel to the U.S. border to seek admission, a CBP officer must determine your admissibility by reviewing your documents and the purpose of your travel.
-
In certain circumstances, a CBP officer may require additional procedures to verify that all requirements for admissibility have been met.
-
You may be directed to an interview area to allow time for additional questions or document review without delay of other travelers.
-
If this procedure, known as a secondary inspection, occurs, remember to be patient and continue to provide clear and accurate answers.
-
Keep Participate Learning’s phone number with you so that the Participate Learning Visa Specialist may be contacted to assist with any further questions about your documents.
-
-
A deferred inspection occurs when a CBP officer grants you a temporary entry to travel to your destination but requires you to appear in person at a local USCIS office to resolve any remaining questions about your admissibility. If this occurs, send an email as soon as possible to the Participate Learning Visa Specialist at [email protected].
Missing Documents or Form I-515A
-
If you arrive at a U.S. border without your DS-2019 or other required travel documents, you may either be sent home or possibly given temporary entry with a form I-515A.
-
You will then be directed to submit additional documents by mail to SEVP (Student and Exchange Visitor Program) within 30 days unless otherwise specified.
-
Failure to complete these instructions within the time required will result in the end of your J-1 status, and you will no longer be authorized to remain in the United States. Contact the Participate Learning Visa Specialist at [email protected] with questions about the Form I-515A.
-
You should always travel with your documents. Please keep in mind the border officers can refuse your entry if you do not have the proper documents.
Canadian Citizens:
-
If you are a Canadian citizen, you do not need a visa for travel to the border. Instead, you must present yourself at a land crossing point or international airport with your DS-2019 and a valid passport.
-
You should also bring your paper receipt showing payment of your SEVIS fee and the additional documentation showing your admissibility in J-1 status as described above.
-
If you enter at a land crossing point, you may still receive a paper I-94 card.
Entry Timing and Departure:
-
Please note: You are not allowed to enter the United States more than 30 days before or after the Program start date listed on your Form DS-2019.
-
If you leave the United States by land, you should give the U.S. Citizenship and Immigration Service (USCIS) Form I-94 to your airline representative at the last U.S. airport from which you will be departing.
-
A USCIS Form I-94 that has been approved by a USCIS inspector can prove that you arrived in the country legally and that you have not stayed beyond the period of stay authorized.
-
IMPORTANT: Please be sure to check the “admit until” date on your I-94 after your arrival in the U.S.
Check Your I-94:
Each time that you re-enter the U.S. you should check your I-94 status to ensure that you were entered in the correct status. This will take you to the website, where you will click on “Get Most Recent I-94”. Then you should enter the required information. It should say J-1 for you, and J-2 for your dependents if applicable. If there is an error, you can click on the “Help” tab on the website.
Bringing Your Family to the U.S.
IF YOU DO NOT PLAN ON BRINGING FAMILY MEMBERS TO THE U.S. DURING YOUR TIME TEACHING WITH PARTICIPATE LEARNING, YOU CAN SKIP THIS CHAPTER.

The U.S. J-2 Visa is a non-immigrant visa for spouses and dependents to accompany a J-1 Visa holder in the United States. Only legal spouses and unmarried natural or legally adopted children under the age of 21 are eligible for J-2 sponsorship.
Decision deadline: You should have already informed Participate Learning of any family members who may be accompanying you at any time during your participation in the Ambassador Teachers Program. We will also need to know when your family members are expected to arrive; you should be prepared to discuss this with your International Admissions Specialist when accepting a teaching position.
Family arrival: Our experience has shown that the most successful way to begin your U.S. teaching adventure is to come to the United States independently. During the first one to two weeks, teachers will be busy attending to arrival paperwork and logistics, finding housing, and settling into their new homes. Teachers report that it is easier to do this in advance, having family members arrive one to two weeks later. This can also help Ambassador Teachers avoid additional transitional costs for family members at orientation, with temporary housing, etc. J-2 dependents cannot arrive in the United States before the J-1 Visa-holder has entered the country.
Financial Responsibilities
The J-1 Visa requires holders to prove sufficient financial resources to cover the expenses of family members accompanying them to the United States. Typical teacher salaries are generally sufficient for individual Ambassador Teachers to live comfortably. It can be difficult, however, to support a family on a teacher’s salary, especially given transition costs. Therefore, additional savings will be needed to help support family members. When creating a budget, you should ensure there will be sufficient funds to support family members while in the United States. Examples of family expenses include:
-
 Living expenses: These expenses include housing, food, transportation, childcare, and utilities. Additional family expense details can be found in the Budgeting section of your admissions course.
 -
Visa expenses: The application fee for each J-2 Visa is $185 USD in most cases. Please note that you do not pay a SEVIS fee for any J-2 dependents.
-
Travel expenses: Teachers must pay for family members’ travel to and from the United States, including luggage fees, as well as any holiday travel.
-
Family health benefits: J-1 Visa holders are responsible for ensuring all accompanying family members have the required health insurance coverage. More details on teacher and family health benefits can be found on the Life and Logistics resource page.
J-2 Visas for dependent children aged 17-21
It is possible for dependent children to obtain a J-2 Visa until they are 21. However, the risk of visa denial increases for J-2 dependent children if they have completed K-12 schooling or have a high school diploma. Participate Learning requires dependents to have concrete evidence of plans to attend college/university if the dependent has completed high school. Please consider the implications of your participation as you apply for your own visa and the visas for your dependents and consider how a visa denial for any J-2 dependents may impact your plans.
Additional Information:
J-2 dependents who wish to study will not qualify for in-state tuition rates or financial aid for U.S. colleges or universities. Consider the costs for foreign students when planning for J-2 children to join you. If you would like to pursue this path, dependents should have concrete plans for study and how to pay for their education. This plan should be brought to the embassy interview.
Lastly, J-2 dependent children must be unmarried to apply for a J-2 Visa. If they are married during their J-2 term, their J-2 Visa will automatically end.
Optional family expenses
-
Orientation fees: While much of your orientation experience will happen online prior to your arrival in the U.S., Participate Learning hosts an in-person arrival orientation for incoming Ambassador Teachers (more details on arrival orientation can be found in the Orientation Overview chapter). Participate Learning is not able to accommodate family members at this orientation with the exception of children of single parents or teaching couples. We have included more details about this in the next section.
-
Spouse employment:
-
Spouse’s salary: Although eligible spouses may apply for work authorization, their income should not be relied upon for anything more than incidental expenses (e.g., travel or cultural activities) according to J-2 Visa regulations.
-
Application: Eligible spouses may apply for work authorization only after they arrive in the United States. Obtaining work authorization may take 90 days or more. Work opportunities may be limited depending on your spouse’s English fluency, professional skills, and the availability of employment in your community. Participate Learning will provide further details on the work authorization process during arrival orientation.
-
Work authorization fee: There is an application fee for spouses wishing to apply for U.S. work authorization, between USD $470 and $520 for general filing, depending on whether you file online or on paper. In certain cases, if biometrics are required, there may be added fees. Fees are current as of September 2024 and are subject to change. Always refer to the latest USCIS fee schedule.
-
Additional Considerations Regarding J-2 Employment:
-
J-2 employment authorization is not intended to support the J-1 principal or replace the J-1’s primary source of financial support.
-
While J-2 dependents with valid employment authorization may generally work in the United States, certain occupations—particularly those requiring state or federal licenses—may involve additional eligibility, timing, or verification requirements that can affect a dependent’s ability to obtain or maintain such positions.
-
Participate Learning cannot provide advice to Ambassador Teachers or their J-2 dependents regarding employment authorization or licensing eligibility. Individuals are encouraged to consult directly with the relevant licensing authority and, if needed, an immigration attorney regarding their specific circumstances.
-
-
-
Options for family members' U.S. arrival
There are two options for timing family members’ U.S. arrival:
Option 1: Arrive within 30 days of Participate Learning in-person orientation.
-
J-2 application materials: Participate Learning will include all visa materials for the teacher and accompanying family members in the welcome package. To ensure the best chance of obtaining their visas, all family members should apply for their J-2 Visas at the same time as the Participate Learning Ambassador Teacher applies for their J-1 Visa.
-
Health benefits coverage: Family health insurance coverage is mandatory. Participate Learning Ambassador Teachers are responsible for paying monthly family benefits costs beginning upon their arrival in the U.S.
-
Family travel timing: Family members should plan their travel to arrive to the U.S. at least one to two weeks after the teacher travels. Our experience has shown that the most successful way to begin your U.S. teaching adventure is to come to the United States independently. During the first one to two weeks, teachers will be busy attending to arrival paperwork and logistics, finding housing, and settling into their new homes. Teachers report that it is easier to do this in advance, having family members arrive one to two weeks later. This can also help Ambassador Teachers avoid additional transitional costs for family members at orientation, with temporary housing, etc. J-2 dependents cannot arrive in the United States before the J-1 Visa-holder has entered the country.
**For single parents and teaching couples only, we offer an exception to arrive together with dependent J-2 Visa holders. If this is your case, Participate Learning can assist with booking family travel through a travel guide that specializes in J-2 dependent travel arrangements.
Option 2: Arrive during the first, second, third, or fourth school year in the U.S.
There are different timelines depending on which year you are in during your Participate Learning time:
-
For teachers in their first year, Participate Learning accepts requests to add family members in May only. There may be some country-specific exceptions to this rule.
-
For teachers in their second, third, or fourth year, Participate Learning accepts requests to add family members in both November and May.
-
For teachers in their fifth year, Participate Learning does not accept requests to add family members.
Discuss with your International Admissions Specialist if you need further information.
Please consult our printable checklist that includes information about what documents you will need to prepare for your J-2 dependent’s arrival in the United States.
Employment in the U.S.
Can I work a part-time or secondary job while in J-1 status?
All part-time or secondary employment must be approved in writing by Participate Learning before you begin work.
Teachers in J-1 status may work only in teaching-related positions at or through an accredited primary or secondary school (grades K–12). Your employer is the school listed on your DS-2019.
Examples of permitted part-time or secondary employment include:
-
Teaching summer school at a primary, middle, or high school within your current school district
-
Teaching in an afterschool program at a primary or secondary school within your school district
-
Teaching in a program run by a K–12 school in your current school district
The following are not permitted under J-1 regulations:
-
Teaching at a community college or university
-
Teaching at a learning center or ESL program not run by a K–12 school
-
Selling teaching materials online, driving for a rideshare such as Uber or Lyft, etc.
Unauthorized employment is a violation of J-1 program regulations and may result in termination of J-1 status.
How to request approval
To request approval for a part-time position, email the Visa Specialist at [email protected] and include the following information:
-
Job title and duties
-
Employer’s full name and address
-
Employer contact name and phone number
-
Location of the additional teaching position
-
Dates of part-time employment
The approved dates cannot extend beyond the validity dates listed on your DS-2019.
After approval
If the position is approved and is outside your current school, a second site of activity will be added in SEVIS, and you will receive an authorization form.
* Provide the authorization form and a copy of your DS-2019 to the part-time employer.
* Keep a copy of the authorization form for your records.
How do I travel with my J visa?
J-1 Teachers and J-2 Dependents
-
Maintaining your immigration status is your responsibility. Failure to follow visa regulations may result in detention, denial of entry, or future visa denials.
-
If you have questions, contact Visa Services at [email protected].
Before You Travel Outside the U.S.
-
Before leaving the United States, confirm that the following documents are valid:
✔ Passport
-
Must be valid for at least 6 months beyond your travel date
✔ Visa
-
Must be valid for re-entry (unless you are a Canadian citizen)
✔ DS-2019
-
Information must be correct.
-
Travel validation (signature in bottom right corner) must be dated within the last 12 months.
Travel Validation (DS-2019 Signature)
Your DS-2019:
-
Confirms your legal status
-
Serves as your work authorization
-
Must always travel with you
Important:
-
Travel validation expires one year from the signature date.
-
If expired, you may be denied entry.
-
Always carry all DS-2019 forms ever issued, stapled together with the newest on top.
-
You must bring a printed copy (digital copies are not accepted at entry).
-
J-1 visa holders, as well as their dependents should not be out of the U.S. for more than 30 days during the school year. There is no limit during the summer, due to the nature of the work. However, you and your dependents should plan to return on time for any teacher work days and the start of the school year.
To update your travel validation:
-
Email Visa Services with:
-
Your name
-
Travel date
-
Date your DS-2019 was last signed
-
-
You will receive a digitally signed DS-2019 by email.
-
Print it and staple it on top of older forms.
-
Do not mail your DS-2019 for signature.
When Re-Entering the U.S.
Present:
-
Original DS-2019 with valid travel signature
-
Valid J visa (except Canadian citizens)
-
Valid passport
-
Recommended: 1–2 recent pay stubs
After entry:
-
Retrieve your electronic I-94 from the CBP website.
-
Confirm it shows:
-
J-1 or J-2
-
“D/S” (Duration of Status)
-
If incorrect, contact Participate Learning immediately.
Canadian Citizens:
-
Do not need a visa
-
Must present valid passport and signed DS-2019
-
Confirm I-94 shows correct category and “D/S”
Maintaining visa status

► Do not engage in any employment outside of your teaching assignment at school, unless you have been authorized by Participate Learning to do so in advance in writing. Unauthorized additional employment is a very serious violation of your J-1 visa status and is grounds for termination of your visa status.
► Maintain required health coverage and financial support for all J-2 dependents at all times.
► Teach enthusiastically and to the best of your abilities, and respond positively to any feedback about your teaching methods.
► Submit any changes of current address or legal name to Participate Learning within five days of the change.
► Keep your DS-2019 form in a safe place at all times, become familiar with the terms of your J-1 visa as listed on the DS-2019 form and always take it with you when traveling outside of the United States. Maintain a current travel validation on your DS-2019 form so it will be valid for international travel.
► Do not attempt to stay in the United States beyond the length of your cultural exchange program. Make plans to return to your home country to complete the exchange part of the J-1 cultural exchange visitor visa.
► Report to Participate Learning any significant problems that arise with your participation.
► Carefully review all correspondence.
► Regularly check the Participate Learning website for updates and urgent notices.
► Do not allow your dependent(s) to work without a valid employment authorization card.
► Do not register to vote or attempt to portray yourself as a U.S. citizen or accept benefits not available to non-citizens.